Tuesday, February 8, 2011

All Things Spring

Spring Property Configurer

As a java/j2ee developer you must have dealt with your share of property files. If you did then your are familiar with java Property implemation that makes it easy to load proerties from a file. If you want to be able to realod property file on change (dynamic reload) you can use apache commons configuration

You might say why spring  PropertyConfigurer, I think it is has to do with varied configuration that it supports (no code required to load the property files) and if you need property overriding you can use PropertyOverrideConfigurer

I have listed the application cotext with property place holder configurer that should support any size j2ee project.  I think the simplest of property configurer put (service.properties) in classpath and conatiner will find properties are avilable for any spring bean in the context.

<?xml version="1.0" encoding="UTF-8"?>
<beans xmlns="http://www.springframework.org/schema/beans"
 xmlns:xsi="http://www.w3.org/2001/XMLSchema-instance"
 xmlns:context="http://www.springframework.org/schema/context"
 xsi:schemaLocation="http://www.springframework.org/schema/beans http://www.springframework.org/schema/beans/spring-beans-3.0.xsd
  http://www.springframework.org/schema/context http://www.springframework.org/schema/context/spring-context-3.0.xsd">

 <!--  Simple property configuration -->
 <bean id="serviceProps" class="org.springframework.beans.factory.config.PropertyPlaceholderConfigurer">
  <!--  file should be available in class path -->
  <property name="location" value="classpath:service.properties"></property>
 </bean>

 <bean id="emailSender" class="prasanna.service.EmailSender">
  <constructor-arg name="host" value="${email.host}"/>
  <constructor-arg name="port"  value="${emai.port}"/>
  <constructor-arg name="emailGroup"  value="${email.group}"/>
 </bean>

 <!--  Simple bean to verify the configuration in a test -->
 <bean class="prasanna.service.PropertyHolderBean">
  <constructor-arg name="prop1" value="$one{one.property1}"/>
  <constructor-arg name="prop2" value="$one{one.property2}"/>
  <constructor-arg name="prop3" value="$one{one.property3}"/>
  <property name="jdcbcUrl" value="$jdbc{url}"/>
  <property name="userId" value="$jdbc{user}"/>
  <property name="password" value="$jdbc{password}"/>
 </bean>

 <!-- Property Configuration prefix with file easy to read the code -->
 <bean id="one" class="org.springframework.beans.factory.config.PropertyPlaceholderConfigurer">
  <property name="location" value="classpath:one.properties"/>
  <property name="placeholderPrefix" value="$one{"/>
  <property name="placeholderSuffix" value="}"/>
 </bean>

 <bean id="jdbc" class="org.springframework.beans.factory.config.PropertyPlaceholderConfigurer">
  <property name="location" value="classpath:jdbc.properties"/>
  <property name="placeholderPrefix" value="$jdbc{"/>
  <property name="placeholderSuffix" value="}"/>
 </bean>

 <!--  This will enable spring to ignore if this property file is not found -->
 <bean class="org.springframework.beans.factory.config.PropertyPlaceholderConfigurer">
     <property name="ignoreResourceNotFound" value="true"/>
     <property name="location" value="classpath:notexists.properties"/>
  </bean>

</beans>

I think if you confiugre your properties this way you can prefix the property file name, It would make the code easier to read and maintain. You can reference a property with file prefix ($one{one.property1})

<bean id="one" class="org.springframework.beans.factory.config.PropertyPlaceholderConfigurer">

I think my favorite is the property that property conifigurer offers (ignoreResourceNotFound and ignoreUnresolvablePlaceholders), I think it is useful when the property file is only optional, I found this very useful when deploying code in different environments (dev, qa, prod  etc)

You can down load complete source code from  here

Application Context Aware

I found this interface to be very useful on legacy projects with spring managed beans. In our poject we intorduced spring for new devlopment but did not covert the exsisting POJO's to spring beans. It means we are left with a problem with no DI (communication from non spring POJO to spring POJO)

That is where this spring framewrok interface (ApplicationContextAware) helped us quite a bit. If you implement this interface you have access to spring ApplicationContext and there by acees to any resource managed by the context. I am listing the POJO we have used in our project here.

public class SpringApplicationContext implements ApplicationContextAware
{

 private static ApplicationContext APPLICATION_CONTEXT;

 public void setApplicationContext(ApplicationContext applicationContext) throws BeansException
 {
  APPLICATION_CONTEXT = applicationContext;
 }

 /**
  * This method must be called statically to gain an access to the Spring-managed beans by name.
  * 
  * @param beanName
  * @return
  */
 public static Object getBean(String beanName)
 {
  return APPLICATION_CONTEXT.getBean(beanName);
 }
}
 
I would like to bring your attention to static getBean method (In a non spring managed you can just do this)
SpringApplicationContext.getBean("blah")

Schedule Task (@Scheduled)
In a project I worked, I needed to monitor a table for errors, When I was searching for a solution I found out that how trivial it was to do it with spring task scheduler. Here are the two steps that you need to do

  • define this annotation tag in your application context file <task:annotation-driven/> 
  • Create a Spring manged bean with a method and annotate the method with @Scheduled

I have listed the code below with a simple task,  The first listing is complete application context file and second listing is a Spring managed bean with a method that executes every 5 seconds

<?xml version="1.0" encoding="UTF-8"?>
<beans xmlns="http://www.springframework.org/schema/beans"
xmlns:xsi="http://www.w3.org/2001/XMLSchema-instance"
xmlns:context="http://www.springframework.org/schema/context"
xmlns:task="http://www.springframework.org/schema/task"
xsi:schemaLocation="http://www.springframework.org/schema/beans http://www.springframework.org/schema/beans/spring-beans-3.0.xsd
http://www.springframework.org/schema/task http://www.springframework.org/schema/task/spring-task-3.1.xsd
http://www.springframework.org/schema/context http://www.springframework.org/schema/context/spring-context-3.0.xsd">

<context:component-scan base-package="prasanna"></context:component-scan>
<task:annotation-driven/>
</beans>


@Component
public class MonitorService 
{
 @Scheduled(fixedDelay=50000)
 public void montor()
 {
   //Run this code at a fixedDelay of (5000 milliseconds / 5 seconds)
  }
}
Although my example provides a fixed delay task, But you can also configure a cron trigger for the task scheduler.


Saturday, January 29, 2011

Java Persistence (SpringFramework + JPA + Hibernate)

Spring Framework simplifies adding persistence to java project with excellent declarative transaction  support  (no more begin and end transaction) and with exception translation (less try catch glue code) making the code less verbose. I think with annotations support starting from Spring 2.5 release brings more of the configuration into POJO and less xml making code more readable. I know the annotation/xml is personal choice in my experience I prefer annotation over xml.

Before starting on persistence with Spring It is worth while to read up on JPA and Spring Persistence Support , Hibernate Persistence API and Spring Transaction Support

I will be using all of what I mentioned above during this example. First step would be create a eclipse workspace and set up a maven java project (my preferred project structure) refer to my previous blog post for that. You can download the complete source code  at the end of this blog.

I have listed the complete spring context file here and would like spend a little time on few of the key components.
<?xml version="1.0" encoding="UTF-8"?>
<beans xmlns="http://www.springframework.org/schema/beans"
 xmlns:xsi="http://www.w3.org/2001/XMLSchema-instance" xmlns:context="http://www.springframework.org/schema/context"
 xmlns:jdbc="http://www.springframework.org/schema/jdbc" xmlns:jee="http://www.springframework.org/schema/jee"
 xmlns:tx="http://www.springframework.org/schema/tx"
 xsi:schemaLocation="http://www.springframework.org/schema/beans http://www.springframework.org/schema/beans/spring-beans-3.0.xsd
  http://www.springframework.org/schema/context http://www.springframework.org/schema/context/spring-context-3.0.xsd
  http://www.springframework.org/schema/jdbc http://www.springframework.org/schema/jdbc/spring-jdbc-3.0.xsd
  http://www.springframework.org/schema/jee http://www.springframework.org/schema/jee/spring-jee-3.0.xsd
  http://www.springframework.org/schema/tx http://www.springframework.org/schema/tx/spring-tx-3.0.xsd">

 <context:component-scan 
  base-package="spring.jpa.domain,spring.jpa.dao,spring.jpa.service" />
  <bean id="entityManagerFactory"
  class="org.springframework.orm.jpa.LocalContainerEntityManagerFactoryBean">
  <property name="dataSource" ref="hsldbDS" />
  <property name="jpaPropertyMap">
   <map>
    <entry key="hibernate.jdbc.fetch_size" value="100"></entry>
    <entry key="hibernate.jdbc.batch_size" value="100"></entry>
    <entry key="hibernate.cache.provider_class" value="org.hibernate.cache.EhCacheProvider"></entry>
    <entry key="hibernate.cache.use_query_cache" value="true"></entry>
   </map>
  </property>
  <property name="jpaVendorAdapter">
   <bean class="org.springframework.orm.jpa.vendor.HibernateJpaVendorAdapter">
    <property name="showSql" value="false" />
    <property name="generateDdl" value="false" />
   </bean>
  </property>
 </bean>
 <bean id="transactionManager" class="org.springframework.orm.jpa.JpaTransactionManager">
  <property name="dataSource" ref="hsldbDS"></property>
  <property name="entityManagerFactory" ref="entityManagerFactory"></property>
 </bean>
 <!-- if a class has @Repository on it, this will translate JPA exceptions 
  to spring exceptions -->
 <bean
  class="org.springframework.dao.annotation.PersistenceExceptionTranslationPostProcessor"></bean>
 <bean id="hsldbDS" class="com.mchange.v2.c3p0.ComboPooledDataSource">
  <property name="driverClass" value="${driverClass}" />
  <property name="jdbcUrl" value="${url}"></property>
  <property name="user" value="${username}"></property>
  <property name="password" value="${passowrd}"></property>
  <property name="initialPoolSize" value="5"></property>
  <property name="testConnectionOnCheckout" value="true"></property>
 </bean>
 <bean class="org.springframework.jdbc.core.JdbcTemplate">
  <property name="dataSource" ref="hsldbDS"></property>
 </bean>
 <bean
  class="org.springframework.beans.factory.config.PropertyPlaceholderConfigurer">
  <property name="location" value="classpath:jdbc.properties"></property>
 </bean>
 <jdbc:initialize-database data-source="hsldbDS"
  enabled="true">
  <jdbc:script location="classpath:dbscripts/createDB.sql" />
 </jdbc:initialize-database>
 <!-- If you would want to use JNDI, You could replace the c3po pool by using 
  the following config <bean id="hsldbDS" class="org.springframework.jndi.JndiObjectFactoryBean"> 
  <property name="jndiName"> <value>java:comp/env/jdbc/hsldbDS</value> </property> 
  </bean> -->
</beans>

Let's look at the following snippet from xml
<context:component-scan  base-package="spring.jpa.domain,spring.jpa.dao,spring.jpa.service" />
It means scan these packages for POJO's with these stereotypes (@Service, @Component, @Entity, @Repository etc ) and register them as spring beans, If you woule like more details on this  refer to this excellent article.  

Let's move on to the other key spring bean that we configured Entity Manger Factory (key JPA component)
<bean id="entityManagerFactory"   class="org.springframework.orm.jpa.LocalContainerEntityManagerFactoryBean">

This bean is the spring implementation of  JPA Entity Manager Factory, It is used by application to obtain a application-managed entity managers (JPA spec's , 5.4) . We are using Hiberanate persistence provider and also spring implementation of JPA transaction manager, As a side note make sure you have a persistence.xml in your project under (META-INF directory) otherwise container would throw an exception. I do not want to go through the entire configuration that would take up the entire blog.

I think that's just about covers the configuration part now let's use this configuration in simple example. I have listed a partial domain object that we would be using in this example to perform save/update/delete operations. I would like to bring your attention to the annotation at the top of the class (@Entity) It is a way to identify a persistable domain object and (@Id is used to denote a primary key). I think rest of the annotations are self explanatory


package spring.jpa.domain;
import java.util.Date;
import javax.persistence.Column;
import javax.persistence.Entity;
import javax.persistence.GeneratedValue;
import javax.persistence.GenerationType;
import javax.persistence.Id;
import javax.persistence.SequenceGenerator;
import javax.persistence.Table;
@Entity(name="spring.jpa.domain.Person")
@Table(name="PERSON")
public class Person 
{
   @Id
   @SequenceGenerator(name="personSeq", sequenceName="PERSON_SEQ")
   @GeneratedValue(strategy=GenerationType.SEQUENCE, generator="personSeq")
   private Integer id;

Now let's demonstrate how to persist this domain object using DAO with @Repository annotation. If you annotate your class with @Repository, spring container will auto-detect and auto-wire the class as spring bean.  The other annotation in the class @PersistenceContext will enable spring container to inject the EntityManager that will be used to save/update/delete any domain object that is configured in the persistence context.

I use a concrete class for my DAO not an interface, It is just personal preference, I have only concrete implementation of the DAO and I think interface would be an over kill. If you look at the save operation that is used to persist this object it is very clean no glue code( no try catch block), You might ask where is the transactional part by design I prefer my service component to handle transactions.

package spring.jpa.dao;

import javax.persistence.EntityManager;
import javax.persistence.PersistenceContext;

import org.springframework.stereotype.Repository;

import spring.jpa.domain.Person;

@Repository
public class SpringJPADAO
{

@PersistenceContext
EntityManager em;
public Person save(Person person)
{
this.em.persist(person);
return person;
}


Let's look at the service object I am using in the example, I would like to bring your attention to @Transactional annotation (If you annotate it at a class level spring will wrap all the public methods in the class with a transaction, You can do this at method level if you prefer that way). If you look at the service method (although it is rather trivial in comparison) only part that is in the code is some thing to do with business logic (free of glue code).


package spring.jpa.service;

import org.springframework.beans.factory.annotation.Autowired;
import org.springframework.stereotype.Service;
import org.springframework.transaction.annotation.Transactional;

import spring.jpa.dao.SpringJPADAO;
import spring.jpa.domain.Person;

@Service
@Transactional
public class SpringJPAService
{
@Autowired
SpringJPADAO dao;
public void save(Person person)
{
  dao.save(person);
}


You can use hibernate tools to reverse generate the domain objects based of db schema OR better yet can use hibernate maven plugin to do this.


You can download the complete source code from here

Friday, January 28, 2011

XML and JAVA

Covert XML to XSD using trang

I am sure there are better ways to covert an XML to xsd than using java with that said, I like the thought of using ant and java to generate xsd and automate it as part of my build.

I found trang while I was looking for way to create an xsd for my jaxb/web service projects, If you have worked with xsd's you would know how tedious it is to write an XSD by hand.

I think trang generates good xsd based of an xml (provided you enter all the data in the xml that is the input to trang), The tweaking is mostly to do with data types on the generated xsd.

I have listed the ant file that you would need to generate an xsd based on the xml file, If you look at the build xml, It is rather simple just provide the path to trang jars and the simple ant java task and you will have an xsd generated

<project name="jaxbMarshall" default="generateXSDFromXML">

 <property name="MAVEN_HOME" value="${user.home}"></property>

 <path id="project.classpath">
  <fileset dir="${MAVEN_HOME}/.m2/repository/com/thaiopensource/trang/20091111" includes="**/*.jar"/>
 </path>

 <target name="generateXSDFromXML">
  <java classname="com.thaiopensource.relaxng.translate.Driver">
   <!-- input xml file -->
   <arg id="-i" value="xxxx.xml"/>
   <!-- out put xsd file -->
   <arg id="-o" value="xxxxx.xsd"/>
   <classpath refid="project.classpath"/>
  </java>
 </target>

</project>

JAXB (XML Marshalling)

If you type java xml marshalling in google you will find a myriad results on marshalling and unmarshalling of xml data, I have used my share of  oxm tools castor, xstream  and JAXB to name a few. I have finally settled on jaxb as my primary tool for marshalling xml data. My reasons are rather simple easy to generate binding objects (maven plugin) and seems to provide decent performance (No memory or cpu usage issues).

I did find an excellent article that delves into performance side of these tools and JAXB seems do a decent job in their test

Let's get to the part of maven plugin (there is an ant task too, if you prefer ant over maven) to do the JAXB, I think JAXB project page does an excellent job in every aspect of documentation but I do find their maven plugin documentation part very spotty. I found this site that has more useful documentiation for jaxb maven plugin.

I could finally put together a maven plugin configuration that I could use in most of my projects to generate JAXB binder objects

I have listed the plugin config here, If you look at the configuration for the phase you will see that I am triggering xsd to java when you run generate-sources (i.e  mvn generate-sources command) that will generate the java binder objects using the XSD's listed in  schemadirectory (any file with *.xsd). I find this configuration to be very simple and reusable in any project where you would be using jaxb for xml marshalling

<project name="jaxbMarshall" default="generateXSDFromXML">

 <property name="MAVEN_HOME" value="${user.home}"></property>

 <path id="project.classpath">
  <fileset dir="${MAVEN_HOME}/.m2/repository/com/thaiopensource/trang/20091111" includes="**/*.jar"/>
 </path>

 <target name="generateXSDFromXML">
  <java classname="com.thaiopensource.relaxng.translate.Driver">
   <!-- input xml file -->
   <arg id="-i" value="xxxx.xml"/>
   <!-- out put xsd file -->
   <arg id="-o" value="xxxxx.xsd"/>
   <classpath refid="project.classpath"/>
  </java>
 </target>

</project>
You can download the complete source code for trang and jaxb project example from here


Tuesday, December 28, 2010

Simple apache maven2 java project

I think my experience with maven began about seven years ago with my team adopting (agile development and continuous integration). I have to say I was hesitant at first and was not sold on maven directory structure. I think all that changed once I started using maven (starting with maven 1).

Before you start on maven I would suggest you to read this book Better Builds with maven available for download at maestro dev and also refer to Apache maven

I used Eclipse Helios with Maven2 Plugin  installed  for setting up this project (You can use nexus Sona Type  to manage your maven repository, I use their community version and it seems do the job for me).

To check if maven plugin is installed in your eclipse go to Window ==> Preferences


I do need to stress the fact that my blog is more geared towards creating maven project using eclipse (you can easily do the same from command line). I think the m2 plugin editor has lot of features that makes it worth while using the m2 editor to set up the project

Create a new workspace (I would expect you to know how to create a new workspace)
Step1: Create new dynamic web project (New ==> Other ==> web ==> Dynamic Web Project)


Step2: Click Next and Add source folders as below


Step 3:  Change the web content directory name as below


Step 4: After you click on finish to create a pom.xml file, Enable Dependency Management as shown below


Step 5: After enabling maven the directory structure of your project should look some thing like this


If maven2 eclipse plugin is installed in eclipse,  when you open pom.xml, It will be opened in m2 plugin editor as shown below

To add a dependency go to Dependencies tab on maven pom editor, Click on Add it will bring up browse menu, You can browse and add Jars as below

To add a plugin go to Plugins tab in pom editor, You can browse or add plugin by clicking on Add button as shown below
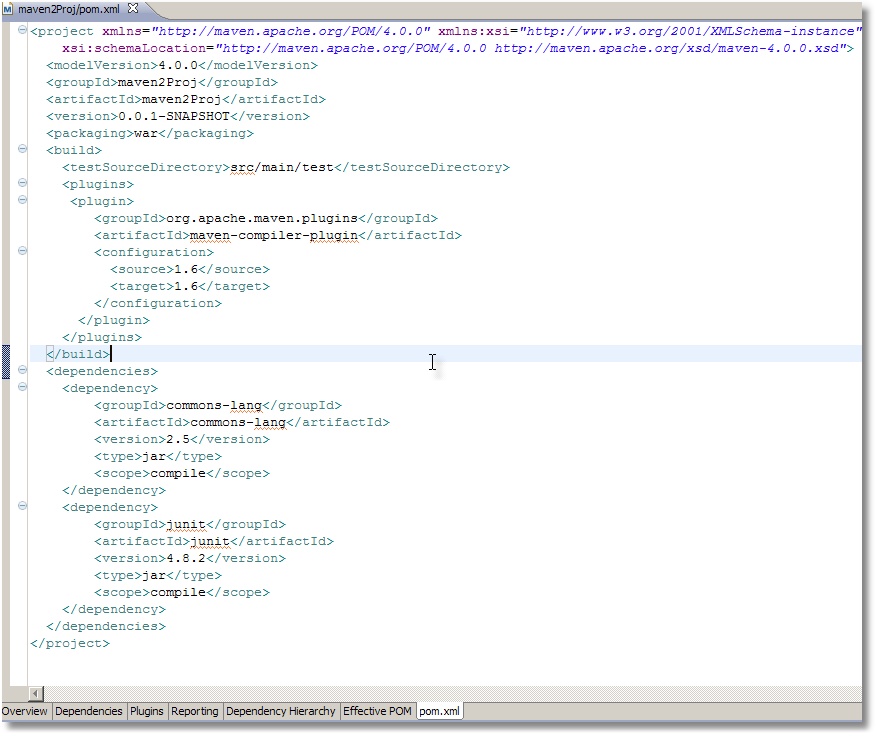
Once you added all the dependencies and plugins that you need, You can verify the pom.xml, go to pom.xml tab on pom editor as shown below

Once you are done building and verifying  pom file, Your project is essentially ready to use maven  pluigins to compile, test and build an artifact etc..


To create a maven artifact run maven install as shown below


The results after maven install run, looks for Build success as below


The target (build output) directory after a maven build as below, You can see the artifact war file is created that is ready to be deployed

This would effectively mavenize (not a real word) your (Java EE ) project

To update project class path file with all the maven dependencies from pom file
  • Select mave2Proj ==> Left Click Mouse ==>  m2 Maven ==> Update Project Configuration
   2.    If you would like to see more tabs on pom editor
  •        Go to Window ==> Preferences ==> Maven ==> Pom Editor ==> Select the check box show advanced tabs in the pom editor
There are lot of maven plugins that would help you towards your goal to automate build and deploy your code put you on path toward continuous integration.

I hope this helps you with your maven Journey.