Friday, September 16, 2011

Spring Application Context Configuration

I have been working with spring framework for a long time and early on I used to maintain different context files for testing, I have done that mostly because of the location of context file was /WEB-INF/ and it is not in either Eclipse or Maven compile/run time class path and my tests would barf with a dreaded File Not Found exception. I realized a better location for spring config files that does not involve MVC configuration should be a source folder under java run time. Since I use Maven project structure It dawned on me that I could use src/main/resources that would resolve compile/run time issues for Eclipse, Maven and also the Server.

Location of spring context files
This is the typical configuration in most my java enterprise applications, I use maven project directory structure so the logically the context files go into resource directory. I also dabbled into placing my spring config files src/test/resources but It still required me to maintain two sets of config files. So I finally settled on src/main/resources as my config directory.
  • src/main/resources/spring-config (Service layer)
  • src/main/webapp/WEB-INF/myapp-servelt.xml (I tend to keep MVC config like controller and view resolver under WEB-INF)
Spring Context files
I used to have more context files but since advent of annotations that number is drastically reduced. You can see that I am firmly in the annotation camp when it comes to configuration whether it is spring or hibernate.  I have typically used the following configuration
Context Files Merging
If you would prefer to minimize the number context file in your application during deployment, You can do some thing like this create an applicationContext.xml and import all the context files that are not part of MVC config. I think it is a good idea to keep MVC config separate. I have listing of an example context file with resources being imported


<?xml version="1.0" encoding="UTF-8"?>
<beans xmlns="http://www.springframework.org/schema/beans"
xmlns:xsi="http://www.w3.org/2001/XMLSchema-instance" xmlns:context="http://www.springframework.org/schema/context"
xmlns:mvc="http://www.springframework.org/schema/mvc"
xsi:schemaLocation="http://www.springframework.org/schema/beans http://www.springframework.org/schema/beans/spring-beans-3.0.xsd
http://www.springframework.org/schema/context http://www.springframework.org/schema/context/spring-context-3.0.xsd
http://www.springframework.org/schema/mvc http://www.springframework.org/schema/mvc/spring-mvc-3.0.xsd">


<context:component-scan base-package="prasanna" />
<import resource="classpath:datasource.xml"/>
<import resource="classpath:applicationContextDAO.xml"/>

</beans>


Junit Testing
It makes running tests easy no need to worry about context file being not found. You can create base test that could be extended by all the other tests some thing like this.

@ContextConfiguration(locations={"classpath:spring-config/applicationContext.xml"})
public class BaseSpringConfigTest
{

}

Since spring context files are under resources directory we can always be sure that Junit tests will run with out fail

Context File for Deploying
Now let's look at the point on how do we deploy the context files to a web application. If you look at any of the spring examples you would see that context files are always under /WEB-INF. In this case every thing still remains the same, I just use the ubiquitous classpath suffix to load the context file. Look at the listing for dispatch servlet below in web.xml


<servlet>
<servlet-name>Spring Dispatch Servlet</servlet-name>
<servlet-class>org.springframework.web.servlet.DispatcherServlet</servlet-class>
<init-param>
<param-name>contextConfigLocation</param-name>
<param-value>
classpath:spring-config/applicationContext.xml
 /WEB-INF/mvcConfigContext.xml
</param-value>
</init-param>
<load-on-startup>1</load-on-startup>
</servlet>


If you look at the listing, I used classpath suffix config to load applicatonContext.xml but I still have mvc config file under the WEB-INF directory. If you use Spring ContextLoaderListener you still do the same just load them as below

<context-param>
<param-name>contextConfigLocation</param-name>
<param-value>classpath:spring-config/applicationContext.xml</param-value>
</context-param>

<listener>
<listener-class>org.springframework.web.context.ContextLoaderListener</listener-class>
</listener>


<servlet>
<servlet-name>Spring Dispatch Servlet</servlet-name>
<servlet-class>org.springframework.web.servlet.DispatcherServlet</servlet-class>
<init-param>
<param-name>contextConfigLocation</param-name>
<param-value>
 /WEB-INF/mvcConfigContext.xml
</param-value>
</init-param>
<load-on-startup>1</load-on-startup>
</servlet>


if you do the above configuration spring as it boot straps the application context treats the context loaded by the listener as the parent of the context loaded by dispatch servlet. I don't want to get to details into it refer to spring documentation or this excellent article.

As a foot note I would say location of config files, It is more to do with being consistent as it helps with on boarding / hand offs as project resources are shifting. 


Thursday, September 15, 2011

Spring Context Configuration and Deployment

I think as an application designer/developer when you are making decisions regarding configuration, It is critically important to think about deployment. I have had my share deployment woes early on, I think that is what made me a firm believer in making deployment task to be as routine as possible to limit the developer's role to bare minimum. In one of the application I work on, We moved the application deployment configuration to data base and applied the configuration using JMX Mbeans as application starts up in a fail fast mode.

Deployment
Here are some things that I learned that would make for a smooth deployment

  • Keep the application configuration during deployment as simple as possible
  • If you don't do that, There will be a lot of hand holding in an enterprise environment where deployment tasks are handled by administrators with little knowledge of (code and application function)
  • I am firm believer in building an artifact (ear or war) using a build tool, There are plenty of build tools available Jenkins, Bamboo , Cruise Control to name a few
  • There should be one and only one deployment artifact (ear or war) that should be preferably available as a download to deployment team to deploy it on either (Quality/Performance/Production) environment
  • Only one deployment artifact means, If you property use files that differ for each environment then that needs to be taken into account during development
  • For example, We had a problem where we needed to configure a JMS Message broker, Web Service that were connected to different sources (IP Address, Channel name, Q name) in different deployment environments (dev, qa, prod etc) 

I am going in reverse with deployment as being first just to bring out the nuances in deployment. I think one of key aspect of application design/development is the configuration that fits various deployment environments (i.e dev, qa, prod). 


Application Configuration
In a typical enterprise java environment there is some kind of application specific config during deployment. I am going to keep it simple for this blog and just provide a template on how one can solve problem like these.  Let's take a look at a web application with spring integration that communicates with a JMS Message broker, It needs to communicate with Test or Prod JMS Message broker based on the deployment environment. I have listed config files that are needed to deploy this application
  • applicationContext.xml  (Core spring context file with service layer beans)
  • jmsBrokerContext.xml (Spring Integration config for JMS Q)
  • messagebroker_qa.properties (Test message broker properties)
  • messagebroker_prod.properties (Production message broker properties)
I am listing a typical Message Broker configuration, To configure this application to communicate with appropriate Message Broker we could create property files for each environment (i.e. dev, qa or prod). 
  1. mqconn.hostName=dns name of the host
  2. mqconn.port=some port
  3. mqconn.queueManager=q manager
  4. mqconn.channel=q channel
  5. mqconn.baseQueueName.qname=queue name
Once property files are created for each environment, We could then pass a environment variable as JVM argument as defined below.
  • -Dserver_env=qa  (pass JVM argument for test server)
  • -Dserver_env=prod (pass JVM argument for prod server)
Then we could use the property place holder to inject the properties for the given server environment. As the spring container boots up It will substitute (qa for ${server_env}) for qa environment and (messagebroker_prod.properties) in production environment

<context:property-placeholder location="classpath:messagebroker_${server_env}.properties"/>

<bean id="connectionFactoryMQ" class="com.ibm.mq.jms.MQQueueConnectionFactory">
<property name="hostName" value="${mqconn.hostName}" />
<property name="port" value="${mqconn.port}" />
<property name="queueManager" value="${mqconn.queueManager}" />
<property name="channel" value="${mqconn.channel}" />
<property name="transportType" value="${mqconn.transportType}" />
</bean>

This is one way same deployment artifact could used to do deploy it in environment we choose, But all this starts during the application design/development itself. 


Tuesday, August 2, 2011

Continuous Integration Using Open Source tools

I am sure most of you with experience in agile practices have heard of the term continuous integration, If you have not heard of it then you should read this great article from Martin Fowler. We have been practicing continuous integration on all the projects where I work for a long time, It did two things for us one keeps tabs on developers from breaking the build and provides the Business Analyst up the minute updates on the product development. In the interest of time I want to limit this blog scope to practicing continuous integration using available open source tools.

One of the of tools that is needed to accomplish continuous integration is Continuous Integration Server, There are open source and commercial servers available with varying degree of difficulty to set up builds. I have experience using (cruise control, and bamboo), I can say both servers provide excellent support for managing builds. I am using bamboo more of late since it has much better user interface and simplifies the build set up a lot but it is a commercial software where is cruise control is open source.

The use case is create a simple web application using eclipse and set up automatic build using Jenkins. To accomplish the task on hand I will be using the following tools
  • Maven  (Dependency/Project management tool)
  • Jenkins (Continuous Integration Server)
  • Ant  (build tool)
  • Tomcat (open source web container)
Now before we get to the build part we need a project that needs an automatic build, for that we need to create a new work space using eclipse and set up maven web app project. If you are not familiar with on how to set up a maven web project, you can read one of my earlier blog that will help.

We will be using maven install plugin to install the war artifact to local maven repository then we will use maven ant run plugin to deploy the war artifact from local maven repository.  To deploy the war file to tomcat you can do the following
  • Stop the tomcat server
  • Delete the war file from tomcat web apps directory
  • copy the war file from local maven repository to maven web apps directory
  • Start the tomcat server (Tomcat deploys any war file that is in the web apps directory as it starts up)

I know that you can deploy the war artifact using maven cargo , I use tomcat service with a good reason in most cases the build machine's run by developers, It just makes it easier to run as a service there by delegating the task of build machine up time to windows.

Step 1


You can download latest versions of Jenkins from here, I used the windows installer version and by default it is installed as windows service listening on port 8080, If you would like to change the port number go to the Jenkins install directory find jenkins.xml file and change the value for the argument httpPort to the port number of your choice. If  you stick with default port then type this url http://localhost:8080 in your favorite browser, If you'r install is good and the Jenkins windows service is running you should see the default admin page. I would advise you to change the Jenkins default port so that it won't conflict with Tomcat container as it also listen on default port 8080

Step 2

Download the this tomcat container apache-tomcat-7.0.19-windows-x86.zip, If you have 64 bit machine then pick the x64 version of the archive. Now follow these instructions and install tomcat as windows service. To verify the install just type this url http://localhost:8080, if you'r install is right and tomcat windows service is running you will see the default tomcat page.

Step 3

Now let's look the maven build file pom.xml, I have listing of maven ant run plugin below,  It will just run this maven plugin after install phase of plugin life cycle build

<groupId>org.apache.maven.plugins</groupId>
<artifactId>maven-antrun-plugin</artifactId>
<version>1.6</version>
<executions>
<execution>
<phase>install</phase>
<goals><goal>run</goal></goals>

Now let's look at the configuration part for the plugin, You can type ant commands between configuration tags of maven ant run plugin, The plugin will execute those ant commands as maven goal. In this case we are executing a windows net start/stop command to start/stop the tomcat service and ant copy delete task to copy war file to tomcat web apps directory. We will be passing the maven properties like m2_repo and tomcatHome as part of Job set up in Jenkins Integration server.

<configuration>
<target>
<echo>"Stopping tom cat server!"</echo>
<exec executable="cmd">
<arg line="/c net stop tomcat7"/>
</exec>
<echo>Delete the current install of war file</echo>
<delete file="${tomcatHome}\webapps\webApp.war" quiet="true" failonerror="false"/>
<echo>Copy the war file from local maven repository to ${tomcatHome}\webapps directory</echo>
<copy file="${M2_REPO}/${groupId}/${artifactId}/${version}/${artifactId}-${version}.war" tofile="${tomcatHome}\webapps\webApp.war" failonerror="true"/>
<exec executable="cmd">
<arg line="/c net start tomcat7"/>
</exec>
</target>
</configuration>


Step - 5 
Let's do some basic configuration for Jenkins , Open Jenkins (http://localhost:8090, I changed my jenkins default port to 8090) admin interface in the browser and click on the link Manage Jenkins located on the left side of admin page (Jenkins Navigation menu)

  • Manage Jenkins


When you click on Manage Jenkins, It will open this page that looks like this


Now Click on Configure System link, Let's add the JDK and Maven installation's directories, In my case I added this in the input box for JDK like this
  • JDK Name: Java 6
  • JAVA_HOME: C:\tools\java\jdk.1.6_16


Repeat the steps and add Maven, That should be enough and Jenkins is ready for setting up builds

Step - 6
Now let's get to the part of creating a job to run a defined interval to build and deploy the application. To do this click on the New Job link on navigation menu It will open a page  like this, In this case we will chose the maven 2/3 project and give it name and click ok


It will open a page with lot of configuration options for simplicity sake we are going to use local work space, To do that go to Build sub header on the page and input location of your work space pom.xml into root pom input box some thing like this, Then click save


We also need to configure two build parameters to successfully run the build tomcatHome and M2_REPO, You can do this by checking the box build is parameterized and adding the string parameter


Now after saving the job, If you look at the menu for the webApp projects you will have a link to Build Now, click on it to force the build now


It will bring up the build now menu with some thing like this, make sure you have the m2_repo set up and click    on Build


You can look the build console by clicking on current build in Build History, The console will show you the out come of the build


If the build is successful then you should be able to see this by clicking on build #1 in Build History, There is also a link to the war artifact that could be downloaded by infrastructure team for production install


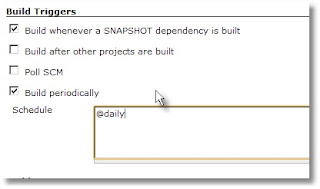
You can configure the Build Trigger like this, In this case I configured this job to built every day, Jenkins also supports cron trigger like expressions


To monitory the build you might want to configure Email, Jenkins sends e-mail on failed builds


I would leave the rest of configuration for you to explore as you see fit based on your needs. As a verification that the build worked in the particular case bring up your web application that you deployed to your local tomcat server.

You can download the complete pom.xml, I have used to set up my project from here 

Thursday, June 2, 2011

Spring Web Service (sws:annotation-driven)

I was digging around the spring source code to better understand the spring configuration for annotation driven web services. It turns out the one line (sws:annotation-driven) that we add to spring context file abstracts a lot of configuration detail.

Let's start at the top, spring has Bean Document Readers and Name Space Handler's to parse the application context as part of initializing the container. It has multiple readers and support classes to do this, If the code tag  (web-services) is defined in the context, It will be handled by WebServicesNamespaceHandler.

The WebServicesNamespaceHandler registers multitude of other parsers to handle individual code tags (ex: annotation-driven, interceptors etc.).

In case of annotation-driven code tag it is the AnnotationDrivenBeanDefinitionParser. It turns this parser does quite a bit of magic

Register's Following End Point Mapping Beans
  • PayloadRootAnnotationMethodEndpointMapping
  • SoapActionAnnotationMethodEndpointMapping
  • AnnotationActionEndpointMapping
Register's these End Point Adapter Beans

  • DefaultMethodEndpointAdapter
  • MessageContextMethodArgumentResolver
  • XPathParamMethodArgumentResolver
  • SoapMethodArgumentResolver
  • SourcePayloadMethodProcessor

It also selectively registers Pay Load Processors, If those parsers are present in class path of the, It looks for a specific class in the package to verify their presence like this

  • register Dom4jPayloadMethodProcessor if (org.dom4j.Element)
  • register XmlRootElementPayloadMethodProcessor if  (javax.xml.bind.Binder)
  • register JDomPayloadMethodProcessor if (org.jdom.Element)
  • register StaxPayloadMethodArgumentResolver if (javax.xml.stream.XMLInputFactory)
  • register XomPayloadMethodProcessor if (nu.xom.Element)


This makes spring web service configuration rather trivial, But my pet peeve with spring is why not make this explicit in the documentation. I say this because I had few redundant bean configurations in my web service context before I got around to look at the source code to understand all the hidden configuration.


Wednesday, June 1, 2011

Spring Web Service Tutorial

I know there are plenty of tutorials on how to create a spring web service not including the example from spring source. In my experience I had to go through more than one of those to create a spring web service in one of my projects few years ago. I think spring web service documentation is an excellent resource but can be confusing (Since it details multiple options for each of various steps involved and can be overwhelming)

I would like to bring all those steps (excluding security: security needs a blog by itsef) into a single blog. The various steps that are involved in creating a spring web service are
  1. Define the contract (spring prides itself as a contract first web service)
  2. Build Java objects from xsd to marshal/unmarshall xml payload using (jaxb maven plugin)
  3. Setting up spring web service 
  4. Soap eclipse plugin to test
  5. Jsp page to invoke the spring web service
The business problem is a basic crud (add/update/delete) patient with response/exception where necessary.

Tools
  1. Eclipse J2EE (I am using Helios) edition
  2. M2Eclipse Plugin, Maven2 Editor
  3. Rinzo,  XML Editor and XSD generator
  4. Soap UI Eclipse plugin
Contract First

We need to define the contract(XSD), but It is very tedious to write an XSD by hand. I have found rinzo eclipse plugin and thai open source to be very useful in this regard. You can generate xsd from an xml using either one of those.

As as first step to create the contract, I wrote two xml files (patient.xml and response.xml) to capture all the necessary attributes for this use case.

To generate xsd from the xml, open the xml using rinzo xml plugin, if you use right mouse click a context menu will be displayed and one of the option is Generate XSD. If you select that option an XSD will be generated, The generated xsd needs some clean up but, I think it does the job

Pay Load Marshalling/UnMarshalling

Now we have our contract defined, I would like to generate the Java objects to marshal and unmarshal the XML payload. I am using jaxb2 to marshal the payload, maven2 has an excellent jaxb plugin to generate Java objects from XSD schema.

<plugin>
 <groupId>org.jvnet.jaxb2.maven2</groupId>
 <artifactId>maven-jaxb2-plugin</artifactId>
 <executions>
 <execution>
  <phase>install</phase>
  <goals>
    <goal>generate</goal>
  </goals>
  <configuration>
  <schemaDirectory>src/main/resources/schema</schemaDirectory>
  <removeOldOutput>false</removeOldOutput>
  <generateDirectory>src/main/java/</generateDirectory>
  <generatePackage>prasanna.model</generatePackage>
  </configuration>
  </execution>
</executions>
</plugin>

The maven2 configuration above to generate Java Objects from xsd is self explanatory.

I defined the plugin as such It will generate the necessary Java objects from xsd during install phase of a maven build, I tend to execute this plugin once then comment it out in pom.xml once Java objects are generated.  There is an ant implementation available to do the same task If you prefer ant over maven.

The other part of configuration for xml marshaling is in spring context file, It needs a context path property to be set (all the classes in this package are placed in Jaxb context path)
<oxm:jaxb2-marshaller contextPath="prasanna.model" id="jaxbMarshaller"/>


Setting up Web Service
I would be using this sequence diagram that is part of spring documentation to detail the set up of the spring web service. The following actors are involved in handling the spring web service requests
  • Message Dispatcher : MessageDispatcherServlet configured in web.xml will be the front controller/dispatcher of web service requests
  • EndPointMapping: I am using annotation @Endpoint with methods to handle a particular crud web service request, The MessageDispatcher invokes dispatch method to find the end point mappings and also end point interceptors if they are defined
  • EndPointAdapter: I defined DefaultMethodEndpointAdapter in spring context file as End Point Adapter
  • EndPoint:  I created an end point PatientEndPoint with a @Endpoint annotation.
Let's look the End Point, It is a POJO with Endpoint annotation at class level, I have a listing of one method getPatient from the EndPoint, I would like to bring your attention to the Payload Root annotation on getPatient method.

I have captured the spring debug for end point look up. If you look at the highlighted part on the debug, The end point look up string matches the Payload root namespace{local} defined on the getPatient method. If they do not match as for as spring is concerned there is no end point matching for the soap request.

DEBUG [http-8080-1]:endpoint.mapping.PayloadRootAnnotationMethodEndpointMapping.getEndpointInternal()60 - Looking up endpoint for [{http://localhost:8080/springWebService/patient/schemas}getPatientRequest]

@Endpoint
public class PatientEndPoint 
{
@Autowired
private PatientService service;

public PatientEndPoint()
{
}
 
@PayloadRoot(localPart="getPatientRequest", namespace="http://localhost:8080/springWebService/patient/schemas")
@ResponsePayload
public Patient getPatient(@RequestPayload GetPatientRequest getPatientRequest)
{
Patient pat = service.getPatient(getPatientRequest.getPatientId());
return pat;
}

I am not going to discuss rest of the configuration as it is well documented in spring web service tutorial. If you look at the applicationWSContext.xml from downloaded source code. It is easy enough to understand the rest of the configuration.

Soap Fault
I am going to use Patient Not Found business process exception as a SOAP FAULT to provide a appropriate message to the clients of this soap service.

I think spring provide's a very elegant and simple solution for this just define a Java exception POJO with an annotation (@SoapFault) and spring will do the rest. In your patient service when you throw this exception when patient is not found spring will do the rest. If a client requests a patient with invalid patient id service will throw the patient not found exception, then spring will convert this exception to a soap fault and send a response to the client.

@SoapFault(faultCode = FaultCode.SERVER)
public class PatientNotFoundException extends RuntimeException 
{

 private static final long serialVersionUID = -543749936886227L;

 public PatientNotFoundException()
 {
  
 }
 
 public PatientNotFoundException(String id)
 {
  super("Patient with id: "+ id + " is not found ");
 }
}

Interceptors
I found Soap Envelope logging interceptor to be very useful during the development, As it display's the complete soap request and the response that is being sent to the client. The configuration for the interceptor is rather trivial

<sws:interceptors>
<bean class="org.springframework.ws.soap.server.endpoint.interceptor.SoapEnvelopeLoggingInterceptor">
 <property name="logRequest" value="true"></property>
 <property name="logResponse" value="true"></property>
</bean>
</sws:interceptors>

SoapUI
You can use soap eclipse plugin to test your web service. If you have soap ui plugin installed on your eclipse

  • Go to SOAP UI perspective
  • Select Projects ==> New Saop UI Project
  • import the wsdl file 
  • you are ready to test your soap service

You can download the complete source code from here

Steps after you download the source code
  • Open a new workspace
  • Create ==> other ==> Web ==> Dynamic Web Project
  • make sure you follow standard maven directory structure for web app
  • Now select  springWebService ==> import ==> General ==> File System ==> Path to your local down load
  • Run Build ==> will down load the necessary jars
  • Select the project right mouse click ==> context menu maven ==> update project config will add maven to eclipse class path
If you do all the above steps you should be able to run the work space as a web app on Tomcat server (version 5 and above). If you start the server type this url

http://localhost:8080/springWebService

This will open a web page there you have links to test Web Service and url to down load wsdl file


Tuesday, February 8, 2011

All Things Spring

Spring Property Configurer

As a java/j2ee developer you must have dealt with your share of property files. If you did then your are familiar with java Property implemation that makes it easy to load proerties from a file. If you want to be able to realod property file on change (dynamic reload) you can use apache commons configuration

You might say why spring  PropertyConfigurer, I think it is has to do with varied configuration that it supports (no code required to load the property files) and if you need property overriding you can use PropertyOverrideConfigurer

I have listed the application cotext with property place holder configurer that should support any size j2ee project.  I think the simplest of property configurer put (service.properties) in classpath and conatiner will find properties are avilable for any spring bean in the context.

<?xml version="1.0" encoding="UTF-8"?>
<beans xmlns="http://www.springframework.org/schema/beans"
 xmlns:xsi="http://www.w3.org/2001/XMLSchema-instance"
 xmlns:context="http://www.springframework.org/schema/context"
 xsi:schemaLocation="http://www.springframework.org/schema/beans http://www.springframework.org/schema/beans/spring-beans-3.0.xsd
  http://www.springframework.org/schema/context http://www.springframework.org/schema/context/spring-context-3.0.xsd">

 <!--  Simple property configuration -->
 <bean id="serviceProps" class="org.springframework.beans.factory.config.PropertyPlaceholderConfigurer">
  <!--  file should be available in class path -->
  <property name="location" value="classpath:service.properties"></property>
 </bean>

 <bean id="emailSender" class="prasanna.service.EmailSender">
  <constructor-arg name="host" value="${email.host}"/>
  <constructor-arg name="port"  value="${emai.port}"/>
  <constructor-arg name="emailGroup"  value="${email.group}"/>
 </bean>

 <!--  Simple bean to verify the configuration in a test -->
 <bean class="prasanna.service.PropertyHolderBean">
  <constructor-arg name="prop1" value="$one{one.property1}"/>
  <constructor-arg name="prop2" value="$one{one.property2}"/>
  <constructor-arg name="prop3" value="$one{one.property3}"/>
  <property name="jdcbcUrl" value="$jdbc{url}"/>
  <property name="userId" value="$jdbc{user}"/>
  <property name="password" value="$jdbc{password}"/>
 </bean>

 <!-- Property Configuration prefix with file easy to read the code -->
 <bean id="one" class="org.springframework.beans.factory.config.PropertyPlaceholderConfigurer">
  <property name="location" value="classpath:one.properties"/>
  <property name="placeholderPrefix" value="$one{"/>
  <property name="placeholderSuffix" value="}"/>
 </bean>

 <bean id="jdbc" class="org.springframework.beans.factory.config.PropertyPlaceholderConfigurer">
  <property name="location" value="classpath:jdbc.properties"/>
  <property name="placeholderPrefix" value="$jdbc{"/>
  <property name="placeholderSuffix" value="}"/>
 </bean>

 <!--  This will enable spring to ignore if this property file is not found -->
 <bean class="org.springframework.beans.factory.config.PropertyPlaceholderConfigurer">
     <property name="ignoreResourceNotFound" value="true"/>
     <property name="location" value="classpath:notexists.properties"/>
  </bean>

</beans>

I think if you confiugre your properties this way you can prefix the property file name, It would make the code easier to read and maintain. You can reference a property with file prefix ($one{one.property1})

<bean id="one" class="org.springframework.beans.factory.config.PropertyPlaceholderConfigurer">

I think my favorite is the property that property conifigurer offers (ignoreResourceNotFound and ignoreUnresolvablePlaceholders), I think it is useful when the property file is only optional, I found this very useful when deploying code in different environments (dev, qa, prod  etc)

You can down load complete source code from  here

Application Context Aware

I found this interface to be very useful on legacy projects with spring managed beans. In our poject we intorduced spring for new devlopment but did not covert the exsisting POJO's to spring beans. It means we are left with a problem with no DI (communication from non spring POJO to spring POJO)

That is where this spring framewrok interface (ApplicationContextAware) helped us quite a bit. If you implement this interface you have access to spring ApplicationContext and there by acees to any resource managed by the context. I am listing the POJO we have used in our project here.

public class SpringApplicationContext implements ApplicationContextAware
{

 private static ApplicationContext APPLICATION_CONTEXT;

 public void setApplicationContext(ApplicationContext applicationContext) throws BeansException
 {
  APPLICATION_CONTEXT = applicationContext;
 }

 /**
  * This method must be called statically to gain an access to the Spring-managed beans by name.
  * 
  * @param beanName
  * @return
  */
 public static Object getBean(String beanName)
 {
  return APPLICATION_CONTEXT.getBean(beanName);
 }
}
 
I would like to bring your attention to static getBean method (In a non spring managed you can just do this)
SpringApplicationContext.getBean("blah")

Schedule Task (@Scheduled)
In a project I worked, I needed to monitor a table for errors, When I was searching for a solution I found out that how trivial it was to do it with spring task scheduler. Here are the two steps that you need to do

  • define this annotation tag in your application context file <task:annotation-driven/> 
  • Create a Spring manged bean with a method and annotate the method with @Scheduled

I have listed the code below with a simple task,  The first listing is complete application context file and second listing is a Spring managed bean with a method that executes every 5 seconds

<?xml version="1.0" encoding="UTF-8"?>
<beans xmlns="http://www.springframework.org/schema/beans"
xmlns:xsi="http://www.w3.org/2001/XMLSchema-instance"
xmlns:context="http://www.springframework.org/schema/context"
xmlns:task="http://www.springframework.org/schema/task"
xsi:schemaLocation="http://www.springframework.org/schema/beans http://www.springframework.org/schema/beans/spring-beans-3.0.xsd
http://www.springframework.org/schema/task http://www.springframework.org/schema/task/spring-task-3.1.xsd
http://www.springframework.org/schema/context http://www.springframework.org/schema/context/spring-context-3.0.xsd">

<context:component-scan base-package="prasanna"></context:component-scan>
<task:annotation-driven/>
</beans>


@Component
public class MonitorService 
{
 @Scheduled(fixedDelay=50000)
 public void montor()
 {
   //Run this code at a fixedDelay of (5000 milliseconds / 5 seconds)
  }
}
Although my example provides a fixed delay task, But you can also configure a cron trigger for the task scheduler.


Saturday, January 29, 2011

Java Persistence (SpringFramework + JPA + Hibernate)

Spring Framework simplifies adding persistence to java project with excellent declarative transaction  support  (no more begin and end transaction) and with exception translation (less try catch glue code) making the code less verbose. I think with annotations support starting from Spring 2.5 release brings more of the configuration into POJO and less xml making code more readable. I know the annotation/xml is personal choice in my experience I prefer annotation over xml.

Before starting on persistence with Spring It is worth while to read up on JPA and Spring Persistence Support , Hibernate Persistence API and Spring Transaction Support

I will be using all of what I mentioned above during this example. First step would be create a eclipse workspace and set up a maven java project (my preferred project structure) refer to my previous blog post for that. You can download the complete source code  at the end of this blog.

I have listed the complete spring context file here and would like spend a little time on few of the key components.
<?xml version="1.0" encoding="UTF-8"?>
<beans xmlns="http://www.springframework.org/schema/beans"
 xmlns:xsi="http://www.w3.org/2001/XMLSchema-instance" xmlns:context="http://www.springframework.org/schema/context"
 xmlns:jdbc="http://www.springframework.org/schema/jdbc" xmlns:jee="http://www.springframework.org/schema/jee"
 xmlns:tx="http://www.springframework.org/schema/tx"
 xsi:schemaLocation="http://www.springframework.org/schema/beans http://www.springframework.org/schema/beans/spring-beans-3.0.xsd
  http://www.springframework.org/schema/context http://www.springframework.org/schema/context/spring-context-3.0.xsd
  http://www.springframework.org/schema/jdbc http://www.springframework.org/schema/jdbc/spring-jdbc-3.0.xsd
  http://www.springframework.org/schema/jee http://www.springframework.org/schema/jee/spring-jee-3.0.xsd
  http://www.springframework.org/schema/tx http://www.springframework.org/schema/tx/spring-tx-3.0.xsd">

 <context:component-scan 
  base-package="spring.jpa.domain,spring.jpa.dao,spring.jpa.service" />
  <bean id="entityManagerFactory"
  class="org.springframework.orm.jpa.LocalContainerEntityManagerFactoryBean">
  <property name="dataSource" ref="hsldbDS" />
  <property name="jpaPropertyMap">
   <map>
    <entry key="hibernate.jdbc.fetch_size" value="100"></entry>
    <entry key="hibernate.jdbc.batch_size" value="100"></entry>
    <entry key="hibernate.cache.provider_class" value="org.hibernate.cache.EhCacheProvider"></entry>
    <entry key="hibernate.cache.use_query_cache" value="true"></entry>
   </map>
  </property>
  <property name="jpaVendorAdapter">
   <bean class="org.springframework.orm.jpa.vendor.HibernateJpaVendorAdapter">
    <property name="showSql" value="false" />
    <property name="generateDdl" value="false" />
   </bean>
  </property>
 </bean>
 <bean id="transactionManager" class="org.springframework.orm.jpa.JpaTransactionManager">
  <property name="dataSource" ref="hsldbDS"></property>
  <property name="entityManagerFactory" ref="entityManagerFactory"></property>
 </bean>
 <!-- if a class has @Repository on it, this will translate JPA exceptions 
  to spring exceptions -->
 <bean
  class="org.springframework.dao.annotation.PersistenceExceptionTranslationPostProcessor"></bean>
 <bean id="hsldbDS" class="com.mchange.v2.c3p0.ComboPooledDataSource">
  <property name="driverClass" value="${driverClass}" />
  <property name="jdbcUrl" value="${url}"></property>
  <property name="user" value="${username}"></property>
  <property name="password" value="${passowrd}"></property>
  <property name="initialPoolSize" value="5"></property>
  <property name="testConnectionOnCheckout" value="true"></property>
 </bean>
 <bean class="org.springframework.jdbc.core.JdbcTemplate">
  <property name="dataSource" ref="hsldbDS"></property>
 </bean>
 <bean
  class="org.springframework.beans.factory.config.PropertyPlaceholderConfigurer">
  <property name="location" value="classpath:jdbc.properties"></property>
 </bean>
 <jdbc:initialize-database data-source="hsldbDS"
  enabled="true">
  <jdbc:script location="classpath:dbscripts/createDB.sql" />
 </jdbc:initialize-database>
 <!-- If you would want to use JNDI, You could replace the c3po pool by using 
  the following config <bean id="hsldbDS" class="org.springframework.jndi.JndiObjectFactoryBean"> 
  <property name="jndiName"> <value>java:comp/env/jdbc/hsldbDS</value> </property> 
  </bean> -->
</beans>

Let's look at the following snippet from xml
<context:component-scan  base-package="spring.jpa.domain,spring.jpa.dao,spring.jpa.service" />
It means scan these packages for POJO's with these stereotypes (@Service, @Component, @Entity, @Repository etc ) and register them as spring beans, If you woule like more details on this  refer to this excellent article.  

Let's move on to the other key spring bean that we configured Entity Manger Factory (key JPA component)
<bean id="entityManagerFactory"   class="org.springframework.orm.jpa.LocalContainerEntityManagerFactoryBean">

This bean is the spring implementation of  JPA Entity Manager Factory, It is used by application to obtain a application-managed entity managers (JPA spec's , 5.4) . We are using Hiberanate persistence provider and also spring implementation of JPA transaction manager, As a side note make sure you have a persistence.xml in your project under (META-INF directory) otherwise container would throw an exception. I do not want to go through the entire configuration that would take up the entire blog.

I think that's just about covers the configuration part now let's use this configuration in simple example. I have listed a partial domain object that we would be using in this example to perform save/update/delete operations. I would like to bring your attention to the annotation at the top of the class (@Entity) It is a way to identify a persistable domain object and (@Id is used to denote a primary key). I think rest of the annotations are self explanatory


package spring.jpa.domain;
import java.util.Date;
import javax.persistence.Column;
import javax.persistence.Entity;
import javax.persistence.GeneratedValue;
import javax.persistence.GenerationType;
import javax.persistence.Id;
import javax.persistence.SequenceGenerator;
import javax.persistence.Table;
@Entity(name="spring.jpa.domain.Person")
@Table(name="PERSON")
public class Person 
{
   @Id
   @SequenceGenerator(name="personSeq", sequenceName="PERSON_SEQ")
   @GeneratedValue(strategy=GenerationType.SEQUENCE, generator="personSeq")
   private Integer id;

Now let's demonstrate how to persist this domain object using DAO with @Repository annotation. If you annotate your class with @Repository, spring container will auto-detect and auto-wire the class as spring bean.  The other annotation in the class @PersistenceContext will enable spring container to inject the EntityManager that will be used to save/update/delete any domain object that is configured in the persistence context.

I use a concrete class for my DAO not an interface, It is just personal preference, I have only concrete implementation of the DAO and I think interface would be an over kill. If you look at the save operation that is used to persist this object it is very clean no glue code( no try catch block), You might ask where is the transactional part by design I prefer my service component to handle transactions.

package spring.jpa.dao;

import javax.persistence.EntityManager;
import javax.persistence.PersistenceContext;

import org.springframework.stereotype.Repository;

import spring.jpa.domain.Person;

@Repository
public class SpringJPADAO
{

@PersistenceContext
EntityManager em;
public Person save(Person person)
{
this.em.persist(person);
return person;
}


Let's look at the service object I am using in the example, I would like to bring your attention to @Transactional annotation (If you annotate it at a class level spring will wrap all the public methods in the class with a transaction, You can do this at method level if you prefer that way). If you look at the service method (although it is rather trivial in comparison) only part that is in the code is some thing to do with business logic (free of glue code).


package spring.jpa.service;

import org.springframework.beans.factory.annotation.Autowired;
import org.springframework.stereotype.Service;
import org.springframework.transaction.annotation.Transactional;

import spring.jpa.dao.SpringJPADAO;
import spring.jpa.domain.Person;

@Service
@Transactional
public class SpringJPAService
{
@Autowired
SpringJPADAO dao;
public void save(Person person)
{
  dao.save(person);
}


You can use hibernate tools to reverse generate the domain objects based of db schema OR better yet can use hibernate maven plugin to do this.


You can download the complete source code from here