I am sure most of you with experience in agile practices have heard of the term continuous integration, If you have not heard of it then you should read this great article from Martin Fowler. We have been practicing continuous integration on all the projects where I work for a long time, It did two things for us one keeps tabs on developers from breaking the build and provides the Business Analyst up the minute updates on the product development. In the interest of time I want to limit this blog scope to practicing continuous integration using available open source tools.
One of the of tools that is needed to accomplish continuous integration is Continuous Integration Server, There are open source and commercial servers available with varying degree of difficulty to set up builds. I have experience using (cruise control, and bamboo), I can say both servers provide excellent support for managing builds. I am using bamboo more of late since it has much better user interface and simplifies the build set up a lot but it is a commercial software where is cruise control is open source.
The use case is create a simple web application using eclipse and set up automatic build using Jenkins. To accomplish the task on hand I will be using the following tools
Let's do some basic configuration for Jenkins , Open Jenkins (http://localhost:8090, I changed my jenkins default port to 8090) admin interface in the browser and click on the link Manage Jenkins located on the left side of admin page (Jenkins Navigation menu)


It will open a page with lot of configuration options for simplicity sake we are going to use local work space, To do that go to Build sub header on the page and input location of your work space pom.xml into root pom input box some thing like this, Then click save

We also need to configure two build parameters to successfully run the build tomcatHome and M2_REPO, You can do this by checking the box build is parameterized and adding the string parameter

Now after saving the job, If you look at the menu for the webApp projects you will have a link to Build Now, click on it to force the build now

It will bring up the build now menu with some thing like this, make sure you have the m2_repo set up and click on Build

You can look the build console by clicking on current build in Build History, The console will show you the out come of the build

If the build is successful then you should be able to see this by clicking on build #1 in Build History, There is also a link to the war artifact that could be downloaded by infrastructure team for production install

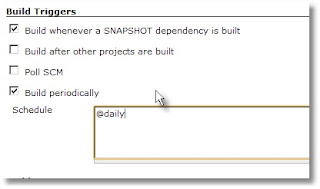
You can configure the Build Trigger like this, In this case I configured this job to built every day, Jenkins also supports cron trigger like expressions
To monitory the build you might want to configure Email, Jenkins sends e-mail on failed builds

I would leave the rest of configuration for you to explore as you see fit based on your needs. As a verification that the build worked in the particular case bring up your web application that you deployed to your local tomcat server.
You can download the complete pom.xml, I have used to set up my project from here
One of the of tools that is needed to accomplish continuous integration is Continuous Integration Server, There are open source and commercial servers available with varying degree of difficulty to set up builds. I have experience using (cruise control, and bamboo), I can say both servers provide excellent support for managing builds. I am using bamboo more of late since it has much better user interface and simplifies the build set up a lot but it is a commercial software where is cruise control is open source.
The use case is create a simple web application using eclipse and set up automatic build using Jenkins. To accomplish the task on hand I will be using the following tools
- Maven (Dependency/Project management tool)
- Jenkins (Continuous Integration Server)
- Ant (build tool)
- Tomcat (open source web container)
Now before we get to the build part we need a project that needs an automatic build, for that we need to create a new work space using eclipse and set up maven web app project. If you are not familiar with on how to set up a maven web project, you can read one of my earlier blog that will help.
We will be using maven install plugin to install the war artifact to local maven repository then we will use maven ant run plugin to deploy the war artifact from local maven repository. To deploy the war file to tomcat you can do the following
I know that you can deploy the war artifact using maven cargo , I use tomcat service with a good reason in most cases the build machine's run by developers, It just makes it easier to run as a service there by delegating the task of build machine up time to windows.
Step 1
You can download latest versions of Jenkins from here, I used the windows installer version and by default it is installed as windows service listening on port 8080, If you would like to change the port number go to the Jenkins install directory find jenkins.xml file and change the value for the argument httpPort to the port number of your choice. If you stick with default port then type this url http://localhost:8080 in your favorite browser, If you'r install is good and the Jenkins windows service is running you should see the default admin page. I would advise you to change the Jenkins default port so that it won't conflict with Tomcat container as it also listen on default port 8080
Step 2
Download the this tomcat container apache-tomcat-7.0.19-windows-x86.zip, If you have 64 bit machine then pick the x64 version of the archive. Now follow these instructions and install tomcat as windows service. To verify the install just type this url http://localhost:8080, if you'r install is right and tomcat windows service is running you will see the default tomcat page.
Step 3
Now let's look the maven build file pom.xml, I have listing of maven ant run plugin below, It will just run this maven plugin after install phase of plugin life cycle build
Now let's look at the configuration part for the plugin, You can type ant commands between configuration tags of maven ant run plugin, The plugin will execute those ant commands as maven goal. In this case we are executing a windows net start/stop command to start/stop the tomcat service and ant copy delete task to copy war file to tomcat web apps directory. We will be passing the maven properties like m2_repo and tomcatHome as part of Job set up in Jenkins Integration server.
Step - 5 We will be using maven install plugin to install the war artifact to local maven repository then we will use maven ant run plugin to deploy the war artifact from local maven repository. To deploy the war file to tomcat you can do the following
- Stop the tomcat server
- Delete the war file from tomcat web apps directory
- copy the war file from local maven repository to maven web apps directory
- Start the tomcat server (Tomcat deploys any war file that is in the web apps directory as it starts up)
I know that you can deploy the war artifact using maven cargo , I use tomcat service with a good reason in most cases the build machine's run by developers, It just makes it easier to run as a service there by delegating the task of build machine up time to windows.
Step 1
You can download latest versions of Jenkins from here, I used the windows installer version and by default it is installed as windows service listening on port 8080, If you would like to change the port number go to the Jenkins install directory find jenkins.xml file and change the value for the argument httpPort to the port number of your choice. If you stick with default port then type this url http://localhost:8080 in your favorite browser, If you'r install is good and the Jenkins windows service is running you should see the default admin page. I would advise you to change the Jenkins default port so that it won't conflict with Tomcat container as it also listen on default port 8080
Step 2
Download the this tomcat container apache-tomcat-7.0.19-windows-x86.zip, If you have 64 bit machine then pick the x64 version of the archive. Now follow these instructions and install tomcat as windows service. To verify the install just type this url http://localhost:8080, if you'r install is right and tomcat windows service is running you will see the default tomcat page.
Step 3
Now let's look the maven build file pom.xml, I have listing of maven ant run plugin below, It will just run this maven plugin after install phase of plugin life cycle build
<groupId>org.apache.maven.plugins</groupId>
<artifactId>maven-antrun-plugin</artifactId>
<version>1.6</version>
<executions>
<execution>
<phase>install</phase>
<goals><goal>run</goal></goals>
Now let's look at the configuration part for the plugin, You can type ant commands between configuration tags of maven ant run plugin, The plugin will execute those ant commands as maven goal. In this case we are executing a windows net start/stop command to start/stop the tomcat service and ant copy delete task to copy war file to tomcat web apps directory. We will be passing the maven properties like m2_repo and tomcatHome as part of Job set up in Jenkins Integration server.
<configuration>
<target>
<echo>"Stopping tom cat server!"</echo>
<exec executable="cmd">
<arg line="/c net stop tomcat7"/>
</exec>
<echo>Delete the current install of war file</echo>
<delete file="${tomcatHome}\webapps\webApp.war" quiet="true" failonerror="false"/>
<echo>Copy the war file from local maven repository to ${tomcatHome}\webapps directory</echo>
<copy file="${M2_REPO}/${groupId}/${artifactId}/${version}/${artifactId}-${version}.war" tofile="${tomcatHome}\webapps\webApp.war" failonerror="true"/>
<exec executable="cmd">
<arg line="/c net start tomcat7"/>
</exec>
</target>
</configuration>
Let's do some basic configuration for Jenkins , Open Jenkins (http://localhost:8090, I changed my jenkins default port to 8090) admin interface in the browser and click on the link Manage Jenkins located on the left side of admin page (Jenkins Navigation menu)
- Manage Jenkins
When you click on Manage Jenkins, It will open this page that looks like this
Now Click on Configure System link, Let's add the JDK and Maven installation's directories, In my case I added this in the input box for JDK like this
- JDK Name: Java 6
- JAVA_HOME: C:\tools\java\jdk.1.6_16

Repeat the steps and add Maven, That should be enough and Jenkins is ready for setting up builds
Step - 6
Now let's get to the part of creating a job to run a defined interval to build and deploy the application. To do this click on the New Job link on navigation menu It will open a page like this, In this case we will chose the maven 2/3 project and give it name and click ok

It will open a page with lot of configuration options for simplicity sake we are going to use local work space, To do that go to Build sub header on the page and input location of your work space pom.xml into root pom input box some thing like this, Then click save

We also need to configure two build parameters to successfully run the build tomcatHome and M2_REPO, You can do this by checking the box build is parameterized and adding the string parameter

Now after saving the job, If you look at the menu for the webApp projects you will have a link to Build Now, click on it to force the build now

It will bring up the build now menu with some thing like this, make sure you have the m2_repo set up and click on Build

You can look the build console by clicking on current build in Build History, The console will show you the out come of the build
If the build is successful then you should be able to see this by clicking on build #1 in Build History, There is also a link to the war artifact that could be downloaded by infrastructure team for production install


I would leave the rest of configuration for you to explore as you see fit based on your needs. As a verification that the build worked in the particular case bring up your web application that you deployed to your local tomcat server.
You can download the complete pom.xml, I have used to set up my project from here